Automated Inbox Organization with + Addresses
Dig yourself out from under your inbox overload with the "+" trick
If you’re like me you probably get a lot of emails every day.
One of the things I do at The Small Idea Company is social outreach to promote my MVP as a Service. Which means I’m constantly signing up for things. Which means I get a LOT of email.
Most of the email I get isn’t junk (Gmail does a pretty good job of handling those), and many of them I actually want to read. But having them all land in the inbox is a recipe for burnout. And having a cluttered inbox means actually important email could get missed.
Triage
Triage is a process of sorting out what’s most important and putting it first, without neglecting the less important items.
A couple of times each day I’ll open my inbox and do triage. Any important emails will get answered right away. Some of the email content that I’ve signed up for will get skimmed. The rest either get archived or deleted; a lot happens automatically.
How do I automate my inbox?
The “+” Trick
Did you know that you can add a “+” to your email address?
For example: [email protected] is my real email address. All of the following are valid email addresses and will all go into my primary email:
I use the first one whenever I sign up for an online course, or one of those “5-day email courses” that are popular right now. I use this to create a filter in Gmail that will automatically put these emails into a folder (more on that below).
The second one is used when I sign up for any kind of promotion or contest, where I know I probably won’t be needing the content from that signup form. This makes it really easy to remember when it’s a list that I’m ok to unsubscribe from.
The last one is really tricky. Sometimes I’ll sign up for something that I just know is going to end up selling my email identity. I hate those guys, but sometimes it’s unavoidable. Rather than using a throwaway email (Mailinator anyone?), I’ll sometimes append the domain of the site where I’m signing up. For example, lets say I give in to the pressure and sign up for a Forbes account so they stop bugging me. I’ll give them the email address “[email protected]”. Now any emails they send me will still come to my inbox, but the email address will be tagged with their domain. Now let’s say they sell my email address to a marketing company, and I start getting ads from some random business. But the email is addressed to “ryan+forbes.com”—busted! Now I know who sold my email address. Hit “spam” on that sucker.
Filters & Labels
One of the reasons I continue to use the Gmail web app instead of any of the other great email clients that I’ve tried is because of the powerful filter features.
The first step is to search for the “TO” email address that I’m targeting. Click the little triangle on the right side of the search field that says “Show search options”. Then enter the email address that you’re targeting in the “To” field. You can just enter the part before the “@“ or you can enter the whole email address. In this example I entered “ryan+courses”.
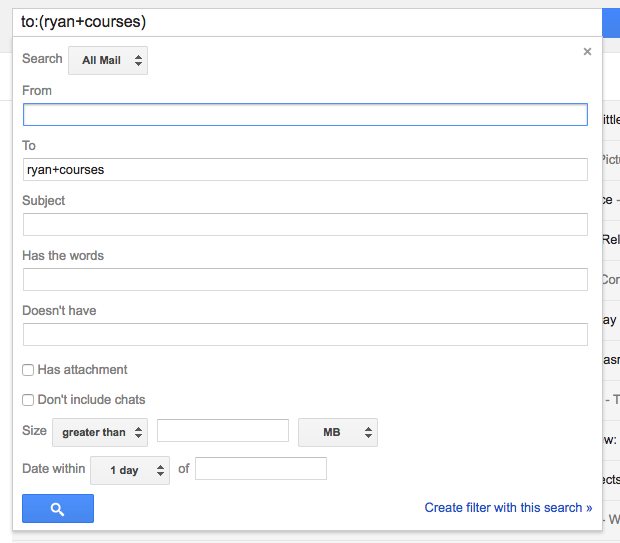
Now click “Create a filter with this search”.
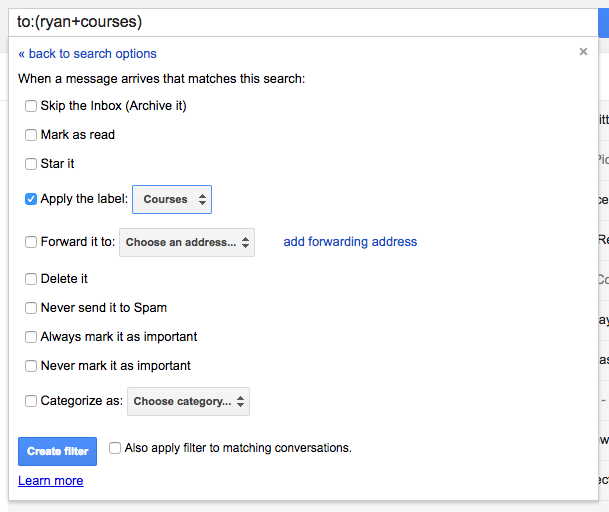
On the next panel you can choose what to do with incoming messages that match that search. Usually I’ll just apply a label—in this case “Courses”. Depending on the label, I might also mark it as important (or never mark it as important). You could also mark it as read and skip the inbox—whatever makes the most sense for you.
I find labels incredibly helpful for organizing my email and grokking my inbox; it’s one of the reasons I’ve never moved away from the original Gmail. Labels combined with the “+ trick” results in a powerful combination for managing a busy inbox.